
Hello!
I understand that your child is into their gaming. But you would prefer that they learn to code or start programming their own games.
You know they’re capable of more than simply following the steps in coding games.
You would like to embrace their creativity. But… you don’t want to put them off by pushing.
Don’t worry – I’ve got you covered!
Going through this exercise, alongside your child, is the best way to start programming. Whether you’ve explored the coding games already out there, or not. Best suited for children between 6 and 9 years.
I use the same process when meeting new students, and it seems to work. Start off with a small demonstration. And letting them take the lead as soon as you feel they’re ready. Asking questions like ‘shall we get the character to change colour?’ and ‘would you like your character to spin?’ – this is to tap into what they are interested in. Right. From. the. Start.
Remember to let them take the lead whenever they look bored, or fidgety!
Starting Programming from Scratch
Let’s go to the Scratch.mit.edu webpage and sign in or create an account.

(At this point, you could let them click ‘explore’ to have a look at the featured projects written by other Scratchers. Be warned this is a rabbit hole – – it could take you a while to get them back on track!)
From there click ‘Create’ or ‘+ New project’.
The code editor window pops up with a character ready to code.
The characters are called ‘Sprites’, and they move around on the ‘Stage’.
The blocks of code are on the left, categorised by what they do and colour coded.
You code by snapping these blocks together, and clicking the Green Flag to run the code.
Scratch gives you a sprite to start off with – the Scratch cat. You’ll also have the editor ready to get started but nothing happens just yet.
Here’s an image of the new project screen:

Green flag means Go!
Look for, and drag a <When Green Flag clicked> block into the middle. The Green Flag starts everything off as Scratch is an event driven programming language, meaning it needs an event to get going.

Look for, and drag a <Move 10 steps> block and snap it together with the <Green flag clicked> block.
Now if you click the blocks or the green flag above the stage, the sprite moves a very small distance across the stage – the ‘steps’ almost relates to the number of pixels, so it is small!

Reading the code, we have ‘When the green flag is clicked, move 10 steps’.
This code is on the sprite itself. So only that sprite will move on the stage.
Warning! If you delete the sprite, the code on the sprite will disappear!
Now… you could do a few different things from here that will give the same result. And that is the joy of coding – there are nearly always more than one way of achieving the same result!
Choose your next step
Option 1 Change the number of steps inside the <Move 10 steps> block.

Kids love to put a huge number in there! So if the number was replaced with 1000 for example, the code would read ‘When the green flag is clicked, move 1000 steps’
Option 2 Add another <Move 10 steps> block underneath the first.
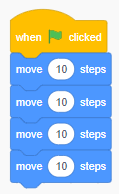
So if you placed 4 x <move 10 steps> blocks together, the code would read ‘When the green flag is clicked, move 10 steps, move 10 steps, move 10 steps, move 10 steps’. Moving the sprite 40 steps in total.
This represents a sequence which is a fundamental concept in coding. Sequences are a bit like following the steps of a recipe.
Option 3 Add a <Repeat 10> block around the <Move 10 steps> block.

So here the code would read ‘When the green flag is clicked, repeat the move 10 steps, 10 times’.
Moving the sprite 100 steps in total. Maths right?! 😉
This one is the more advanced option and introduces the concept of a loop. Loops are fundamental to coding where we get the computer to do a lot of the work for us without having to repeat typing the code. It makes it easier to read too! Bonus.
Whichever option you choose, the sprite may disappear off the stage and we get calls of ‘Oh no! How do I get it back?’! Again, there’s a ‘choose your own adventure’ vibe here, but personally, I like to set the scene.
Much like a race, you have a starting position and it’s the same in most programs. Like a race, you start behind the line until a bell indicates that you run. With your sprite, when you click the Green Flag, it would be great if it started at the same spot, and then moved. So let’s do that.
On your marks!
Grab your sprite if you can still see it, and drag it into the centre of the stage or wherever you’d like it to start from. If you can’t see the sprite, do the following and enter a 0 for the x and y value. Ta dah! Your sprite reappears!
![]()
Look for and grab a <go to x: y: > block from the motion section. The values of the x and y coordinates will be exactly where your sprite is, or enter 0 for x and y to centre your sprite on the stage.
Place that block underneath the <green flag> block, before the other blocks.

Now the code will read ‘When the green flag is clicked, put the sprite in the centre of the stage and then move it’.
It would be nice to have that sprite come back by itself wouldn’t it?
Let’s add a <glide 1 secs to x: y: > block underneath all the blocks you have so far. What happens now?

Have a play with the numbers to see what happens. Can you see the effect of those changes?
Recap
We have created a small animation with the cat sprite. We set a starting position, moved the sprite across the screen and had it glide back again. Woohoo! Fun, huh?
Now see if you can work out how you could get the sprite to spin. Hint <Turn 15 degrees>.

Where would you place that block(s) to repeat that spin?
You could also add a <Next costume> block – so the cat sprite actually looks like it’s running in a circle!
![]()
A real animation like stop-motion.
What do you think to your creation?
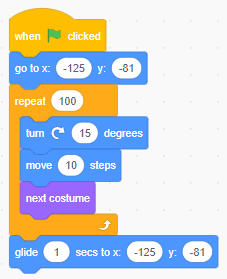
Here’s the image of the complete code, in case you got side-tracked trying out all sorts of different blocks!
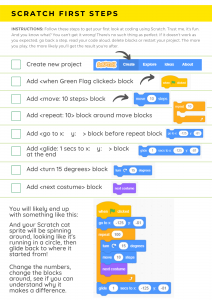
I’ve also created a handy downloadable version of this post, along with a easy to follow checklist, click here to get it.
I hope you enjoyed coding with your child, it can be so satisfying learning something new and fun like coding! Any questions, drop me a message or an email.
If you’d like help with how to learn coding, check out my shop to buy a workbook, join one of my group courses or book some one to one sessions with me.
Cheers Jan
0 Comments